How to create snow in Photoshop is extremely simple
– Adobe Photoshop is a software that specializes in editing images, colors, or deleting objects, separating objects from the background as we want. But later versions of this Adobe software are increasingly upgraded and improved, to serve the purpose of making it easier for users to use and achieve greater efficiency.
Each version of Adobe has new features as well as old features that get better and better. For the 2021 version, we have some additional features such as:
- Refine Hair (helps separate a girl's hair to be more detailed and thorough).
- Sky Replacement (changes the sky of an image naturally and there are many skies suitable for different scenes),
- Neural Filters (This is a feature that helps restore photos and colors for old photos that have been partially lost or may have lost color). You must purchase a license to use this software.
Here I will guide you How to create snow in photoshop is extremely simple simple: I also had it before Instructions on how to create rain in photos in Photoshop You can refer to it for more information
- How to create Photoshop actions extremely quickly
- The best way to remove acne in photoshop in 2022
- How to combine funny pictures with Photoshop
- How to create rain in Photoshop is extremely simple
- The latest and most beautiful way to adjust colors in Photoshop in 2022
Simple steps to create snow in Photoshop
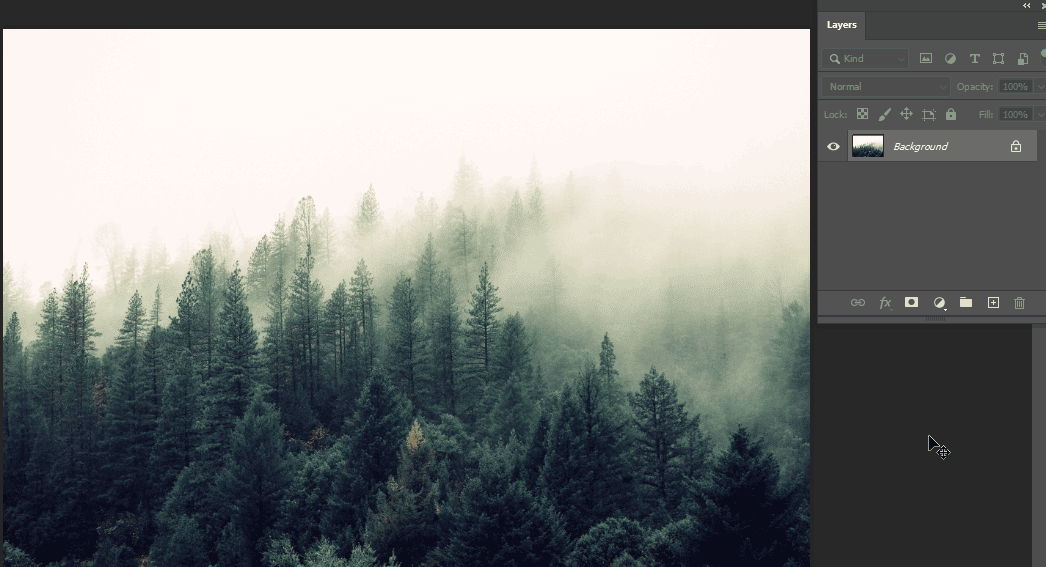
Step 1: Open the photo you want to create snow
- We open an image that we want to give a snow effect to
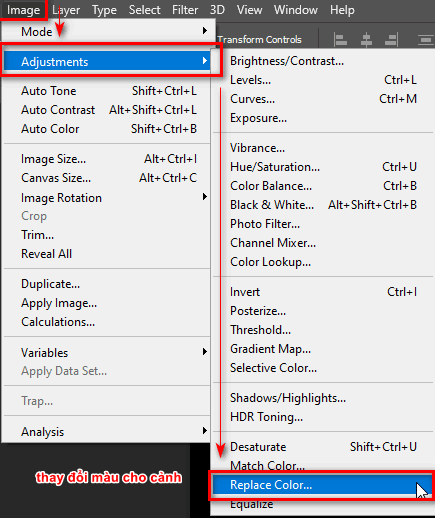
Step 2: Change the color as well as a white coating of snow
- On the menu bar Image > Adjustments > Replace Color
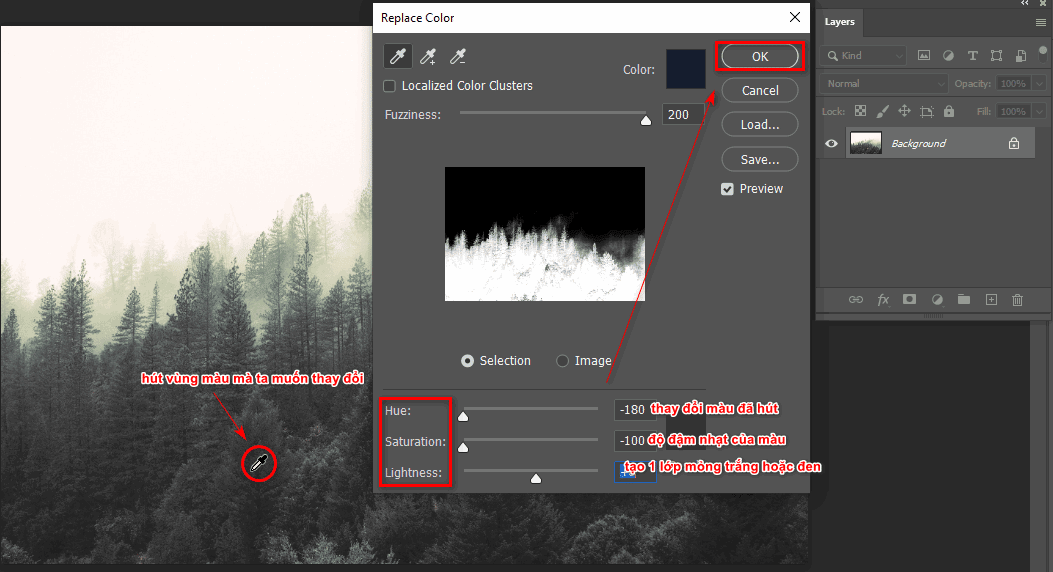
- At this point, a parameters panel will appear to use to edit colors in some positions you want.
- At this time, my mouse cursor is shaped like a tube to absorb the green color of the tree to change the color to white to suit the winter.
- Then I control the color bar Hue , Saturation so that white appears in the tree areas you have selected.
- At this point, I can increase the Lightness part a bit to create a thin white film for a more realistic photo.
- Then I click OK to end the tool.
Next, use the color extraction tool to get the selection as shown below
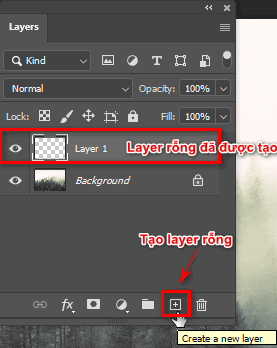
Step 3: Create an empty layer
- Create 1 empty layer equals (shortcut is Alt+Ctrl+Shift+N) or we can click on the (+) next to the trash can icon behind the layer grouping icon (Create a new layer)
Step 4: Put the black background color directly on top of the layer you just created
- I select the empty layer that I just created
- Then I put a black background on top of that layer using the keyboard shortcut (Alt+Delete) if black is above, and if color is below, use the shortcut (Ctrl+Delete)
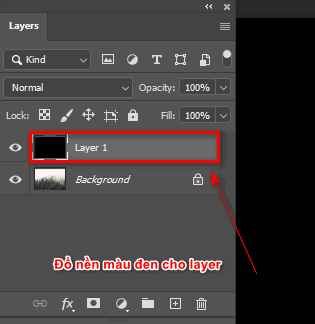
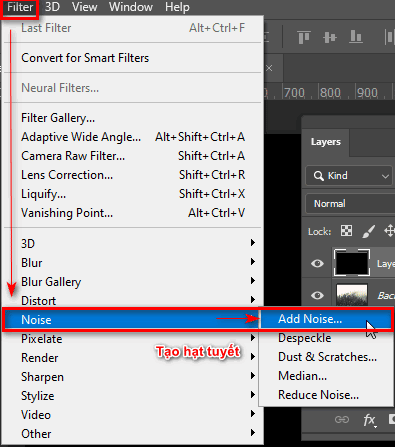
Step 5: Create snow effects using Noise on the menu bar
- I go to the menu bar and select Filter > Noise > Add Noise (used to create noise for snow particles)
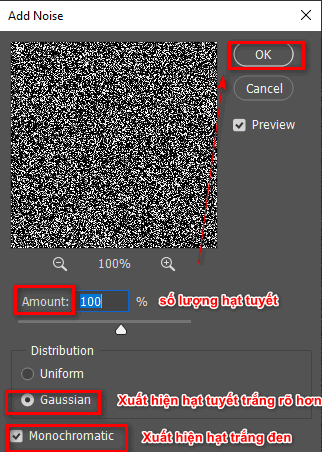
- After selecting, a parameter table will appear Add Noise
- I will increase Noise in Amount (increased noise)
- Then I choose Gaussian to make white noise appear more and more clearly
- At the same time, I checked the item Monochromatic to make black and white particles appear (if not, some other colored particles will appear)
A dialog box appears and you can set the parameters below
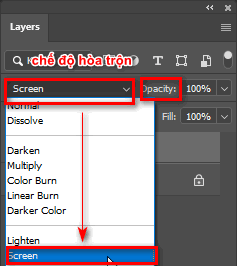
Step 6: Blend Layers
- After creating it, I have to use the blending mode Layer Only then can I see those snowflakes
- We click on it Layer The snow effect I just created with Noise After that, adjust the blending mode Screen (used to remove all dark areas of that layer) this tool is located on the board Layer next item Opacity (image clarity)
Step 7: Increase or decrease snow density through increasing the brightness of Levels
- At this time, the snow effect is not beautiful and we really have to choose more parts Levels is in the table Adjustments (To open the Adjustment panel, go to the menu bar and select Window > Adjustments) or we can open directly at the layer with the circle icon (Create New Fill Or Adjustment Layer) icon design add vector mask (create a mask)
- At this point I will have 1 layer Levels Use it to increase or decrease the snow particles more or less depending on you
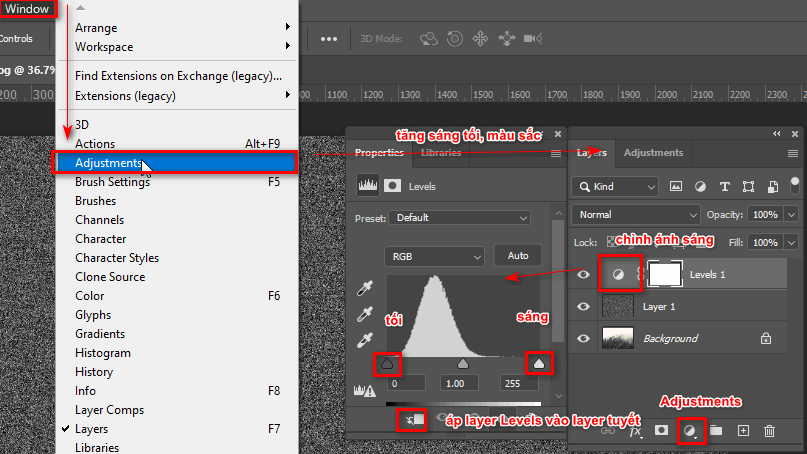
Step 8: Apply that Levels layer to the snow effect layer
- After the table appears Levels then we hold the key Alt between 2 Levels layers and a snow layer Later left click To apply the Levels layer to the snow layer, or you can look under the Levels parameter table and see an icon with a downward arrow, click on it (top icon at the bottom).
- At this point, I just increase or decrease the light and dark parts of the Levels tool to create more or less snow (if you want more, increase the light areas, and if you want less, increase the dark areas).
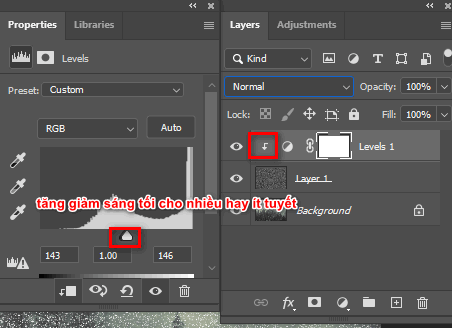
Step 9: Adjust the shape and size of the snow
- Before changing the shape, you should duplicate the two layers Snow layer and Levels layer
- Then I go back to the first snow layer and go to the menu bar to select it Filter > Pixelate > Crystallize
- At this time, the parameter table will appear Crystallize To increase the size of the snow particles (should be below 10), after finishing, click OK because if you choose high, it will make the image dense with snow.
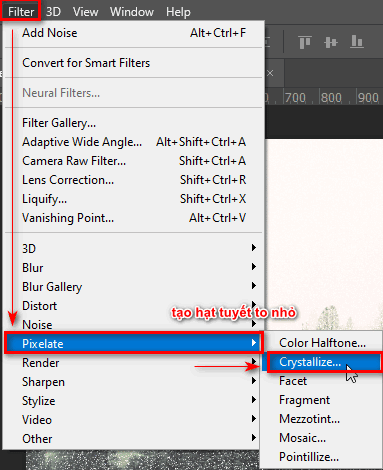
Step 10: Adjust the direction of the snow
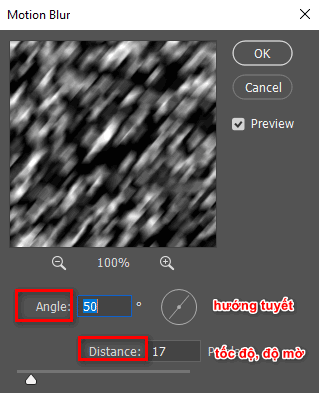
- Using the previously copied snow layer, go to the menu bar and select it Filter > Blur > Motion Blur
- Then the table's parameters panel appears Motion Blur At this time we navigate the falling snow Angle (snowfall direction), Distance (opacity, snow speed) then click OK
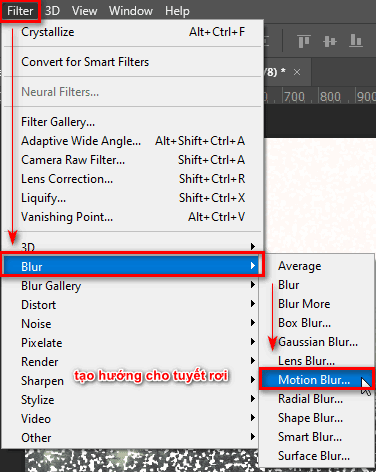
Set the parameters so that we have a sliding opacity as shown below
Step 11: Change the color of the sky
- Select Layer Background First, then we go to the menu bar and select Edit > Sky Replacement (used to change the sky to match the snow scene)
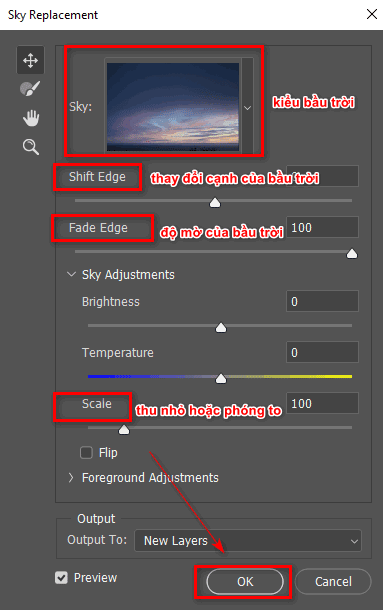
- At this time, a Sky parameter table will appear including many types of sky, Fade Edge (opacity of the sky), Scale (zoom out or zoom in), Shift Edge (change the edge of the sky)
- After adjusting, click OK
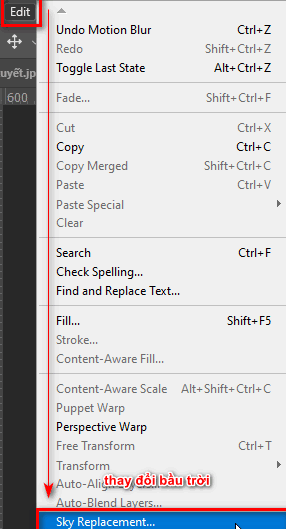
After the dialog box appears, you just need to choose a sky that suits your picture and it's ok
Step 12: Result of how to create snow in photoshop
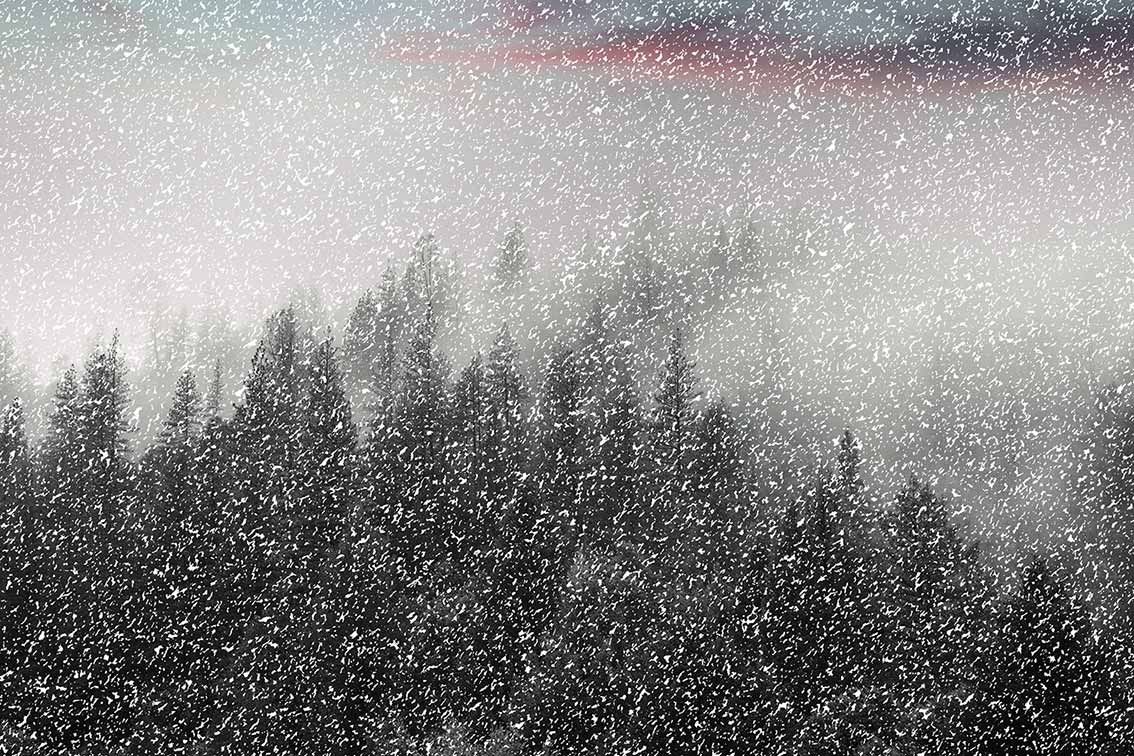
- This effect is suitable for different climates and winter situations or year-end occasions such as Christmas.
- In addition, you can further edit the color and lighting of the photo to make it more suitable for the climate, limiting the adjustment to blur or too much brightness because it can lose the beautiful details of a photo. .
- It can also make the snow particles disappear. Maybe when you first use this effect, the effect may not be as beautiful and natural as mine at first, but after a while you do it a lot and it will become smoother and more naturally beautiful, but if you haven't mastered it yet. party tools Photoshop or you are new to it Photoshop Then you should read and learn about some of the tools that I have introduced through a number of articles about each tool in great detail.
- These articles are usually for those who are new and are learning about Photoshop course Help me understand the tools and functions of those basic tools.
- How to create Photoshop actions extremely quickly
- The best way to remove acne in photoshop in 2022
- How to combine funny pictures with Photoshop
- How to create rain in Photoshop is extremely simple
- The latest and most beautiful way to adjust colors in Photoshop in 2022
Epilogue
– Through this article, I have guided you further How to create snow in photoshop for this Christmas season then to live virtually. If you read this article and find it most useful at this time you need it, don't hesitate to try it and share this article with everyone to create this snow effect for the upcoming Christmas season. If you want me to write more effects articles as well as good tips in Photoshop Please give me 5* to have more motivation to write articles for you guys
– If you want to learn about photoshop course then you can find out here Graphic Express. In addition, when registering, you will be given a set of copyrighted and high-value documents, comfortable study time suitable for students and working people, and 1:1 tutoring to help make learning as effective as possible, at a reasonable price. It is very suitable for everyone, including first-year students.


