How to add fonts to wordpress. When you type text in WordPress, the editor is where you create and edit content for your website. However, the WordPress editor already has fonts, but they are too few and not enough for you to customize the content on your website. In this article, I will guide you. how to add font to wordpress editor Extremely fast to help you create your content easily and more beautifully
How to add fonts to wordpress as you like
Quick action. Add fonts to the wordpress editor as you like. You need to do the following 4 steps.
- Prepare your custom font, note that the font must be Vietnamese.
- Create custom CSS file
- Master the CSS rules for fonts so that fonts can work
- Link Custom CSS Files to WordPress
See more.
- How to create a slider that runs super smoothly on flatsome
- Foxtool multi-purpose utility toolkit for website
- How to put category descriptions below products
- The code shows nice promotions for flatsome like Cellphones
I. Prepare custom Vietnamese font
First, you need to prepare a set of custom Vietnamese fonts that you want to put into the frame when editing text. For the simplest way, you can use Google fonts as the most standard. If you have a higher level, you can Vietnamese or get some suitable fonts.
Method 1: Using Google Fonts :
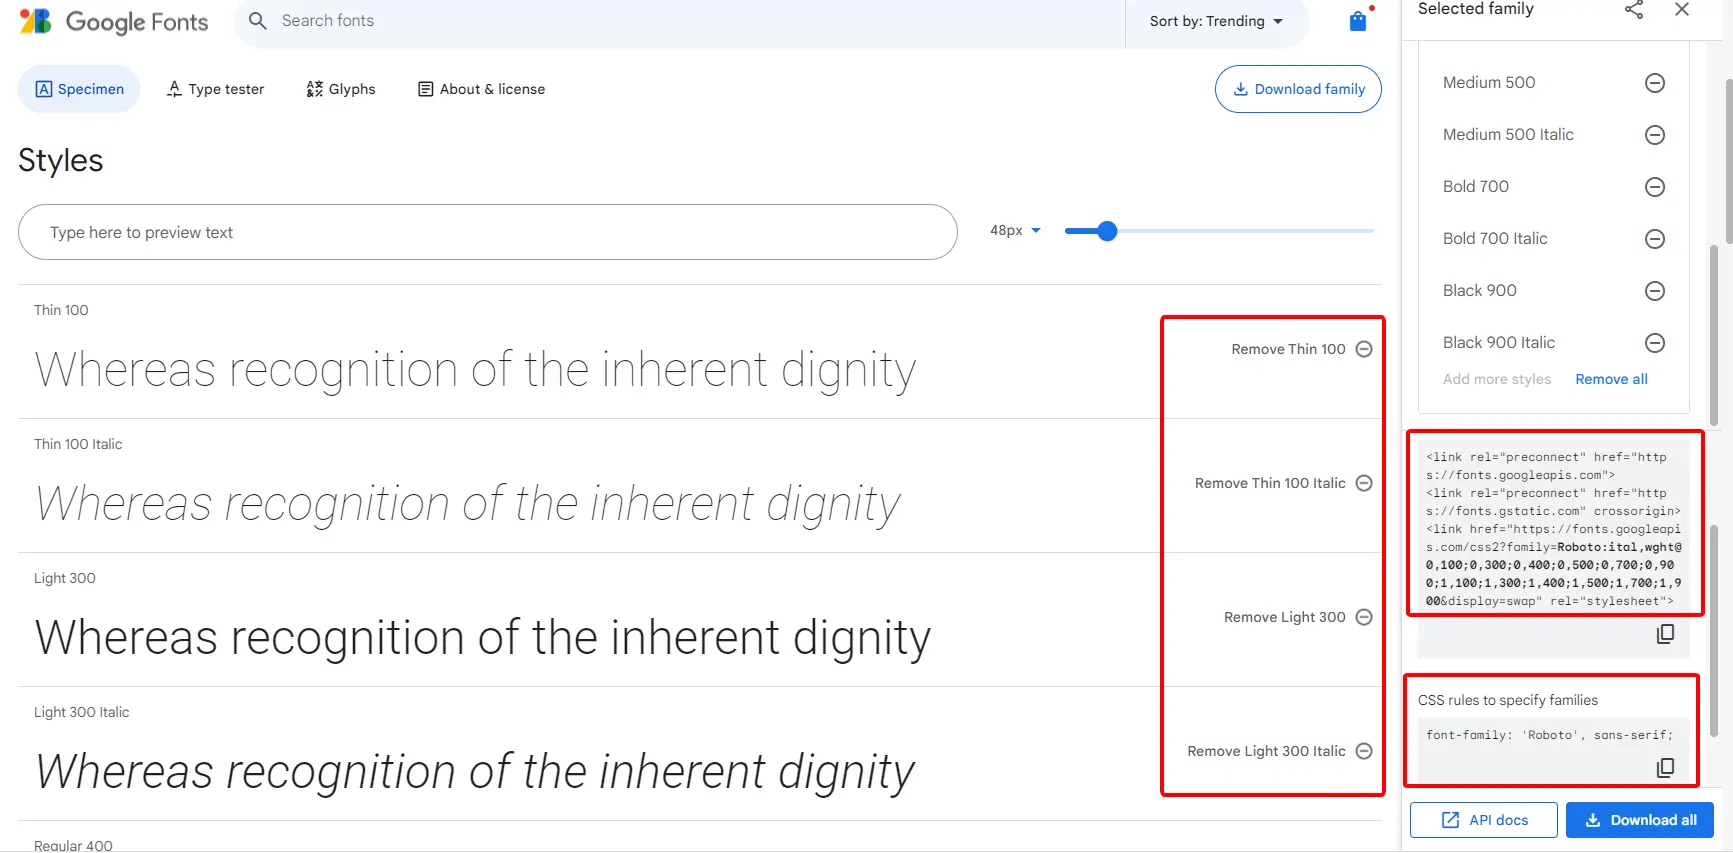
You can access the page on the website Google Fonts to download then choose a font that you want to use for your website. At each specific font, this is the size of the font, there is an embed code for each font. See details as shown below.
Method 2. Use custom fonts:
If you already have a custom font, the first thing you need to do is convert it to web font format. There are many online websites that allow you to do this. You can access website transfonter.org to convert your computer's fonts into fonts for your website.
Step 1: Add fonts
Step 2: Convert
Step 3: Download
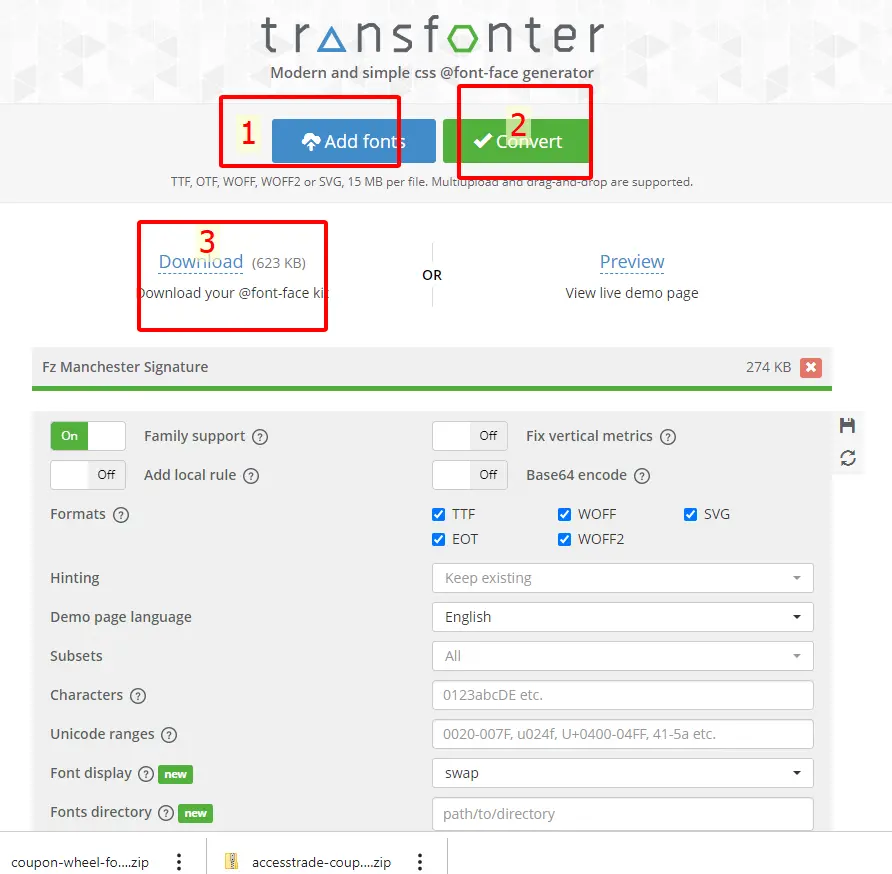
Step 4: After you download the file, you proceed to unzip it and you will see the file as shown below. This file is the font file you use for the web environment.

II: Create a custom CSS file so that the website can recognize the font
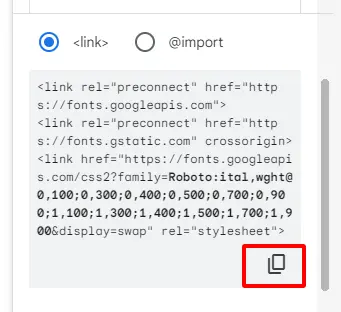
For google fonts
If you use Google font, you don't need to create it, just copy its link:
For fonts that you want to upload yourself
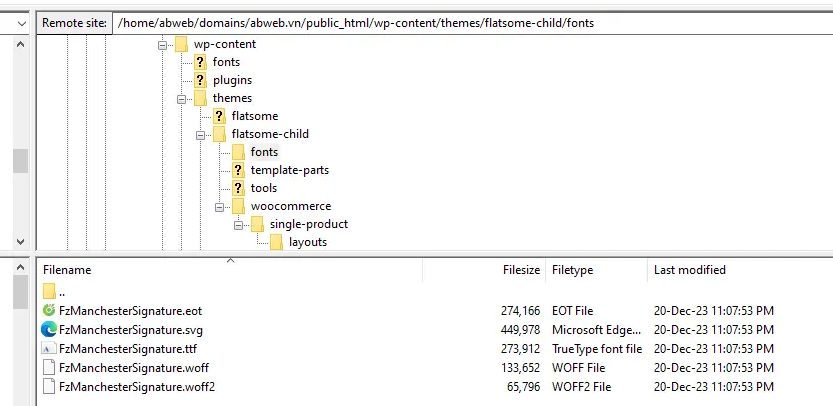
In case you create a font converted from your computer to a web font as I described above, you need to go to the themes or child theme folder and create a folder named fonts. Then upload all the font files you downloaded earlier into it.
III. Add CSS rules for fonts
For google fonts
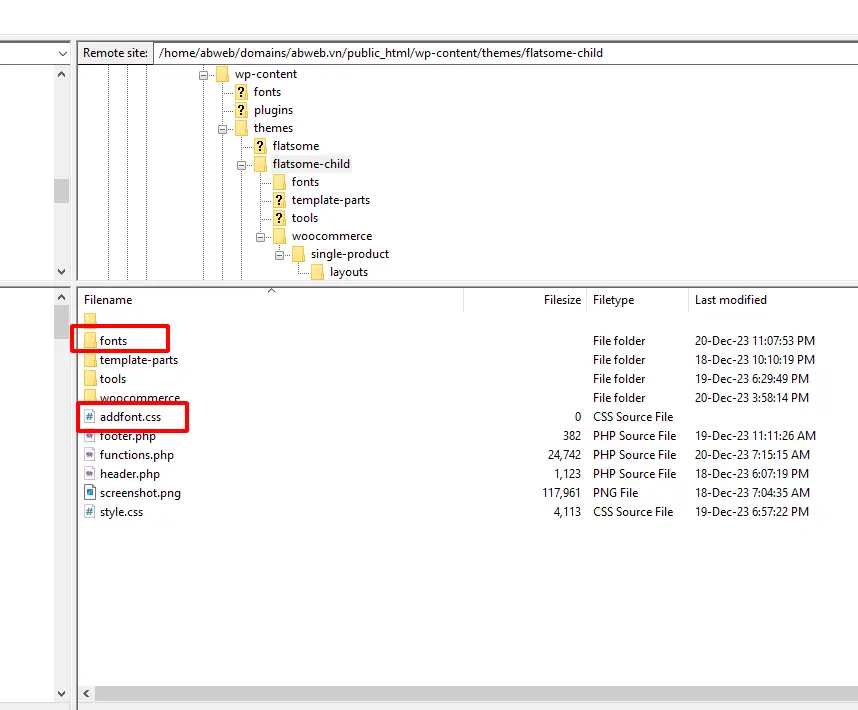
You will need to create a file in the Fonts section. For example, here I create it with the name addfont.css. Copy the code below
@import URL ( 'https://fonts.googleapis.com/css2?family=Roboto:ital,wght@0,100;0,300;0,400;0,500;0,700;0,900;1,100;1,300;1,400;1,500;1,700;1,900&display= swap' );
For fonts that you want to upload yourself
– If you insert fonts from your computer, you must also create a file named addfont.css in the Fonts folder but only the code inside is different. The code inside will be as follows:
@font-face { font-family: 'Fz Manchester Signature'; src: URL('fonts/FzManchesterSignature.eot'); src: URL('fonts/FzManchesterSignature.eot?#iefix') format('embedded-opentype'), URL('fonts/FzManchesterSignature.woff2') format('woff2'), URL('fonts/FzManchesterSignature.woff') format('woff'), URL('fonts/FzManchesterSignature.ttf') format('truetype'), URL('fonts/FzManchesterSignature.svg#FzManchesterSignature') format('svg'); font-weight: normal; font-style: normal; font-display: swap; }
Note: How to add fonts to wordpress Whatever your font is, you should rename the font to the correct name and format as the font you uploaded. Avoid copying it exactly, which will cause your uploaded font to not work. Please see the details in the image below and follow the steps.

III. Link files using CSS to make fonts work
This is the most important step of the article so that the fonts can work properly with the path, so please read the content below carefully!

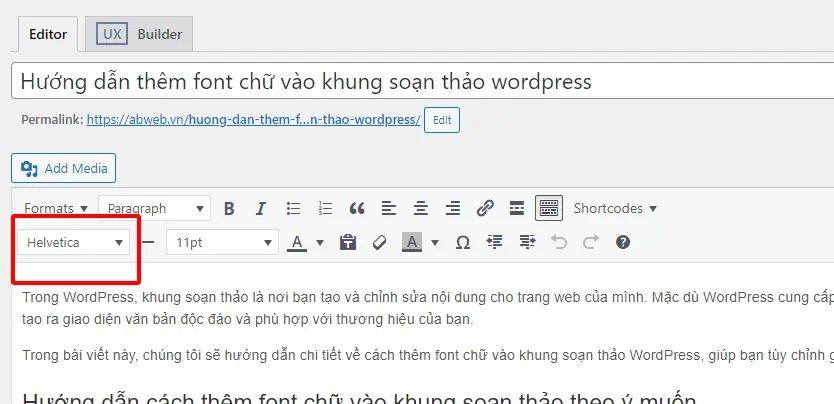
Initially, my text editor did not have a place to select the font I put in, so we had to pull it out using the code below. You just need to copy this code into the section function.php that your child theme is using.
add_filter('mce_buttons_2', 'add_size_and_font',888 ); function add_size_and_font( $options ) { array_shift( $options ); array_unshift( $options, 'fontselect'); return $options; }
When you copy paste and save. Check and reload, you will see the image below is successful:
Next, I need to declare the following code into the file. function.php to declare the order of priority of fonts appearing in turn
In the example, I need to add the Fz Manchester Signature font, so I will declare it as below. You can replace it with your font name, for both fonts added from Google or fonts uploaded by yourself.
function list_list_font_add( $settings ) { global $settings_list_font; $settings['font_formats'] = "Fz Manchester Signature='Fz Manchester Signature',sans-serif;". 'Arial=arial,helvetica,sans-serif;'. 'Arial Black=arial black,avant garde;'. 'Book Antiqua=book antiqua,palatino;'. 'Comic Sans MS=comic sans ms,sans-serif;'. 'Courier New=courier new,courier;'. 'Georgia=georgia,palatino;'. 'Helvetica=helvetica;'. 'Impact=impact,chicago;'. 'Symbol=symbol;'. 'Tahoma=tahoma,arial,helvetica,sans-serif;'. 'Terminal=terminal,monaco;'. 'Times New Roman=times new roman,times;'. 'Trebuchet MS=trebuchet ms,geneva;'. 'Verdana=verdana,geneva;'. 'Webdings=webdings;'. 'Wingdings=wingdings,zapf dingbats;'; $settings_list_font = $settings; return $settings; } add_filter('tiny_mce_before_init', 'name_list_font_add');
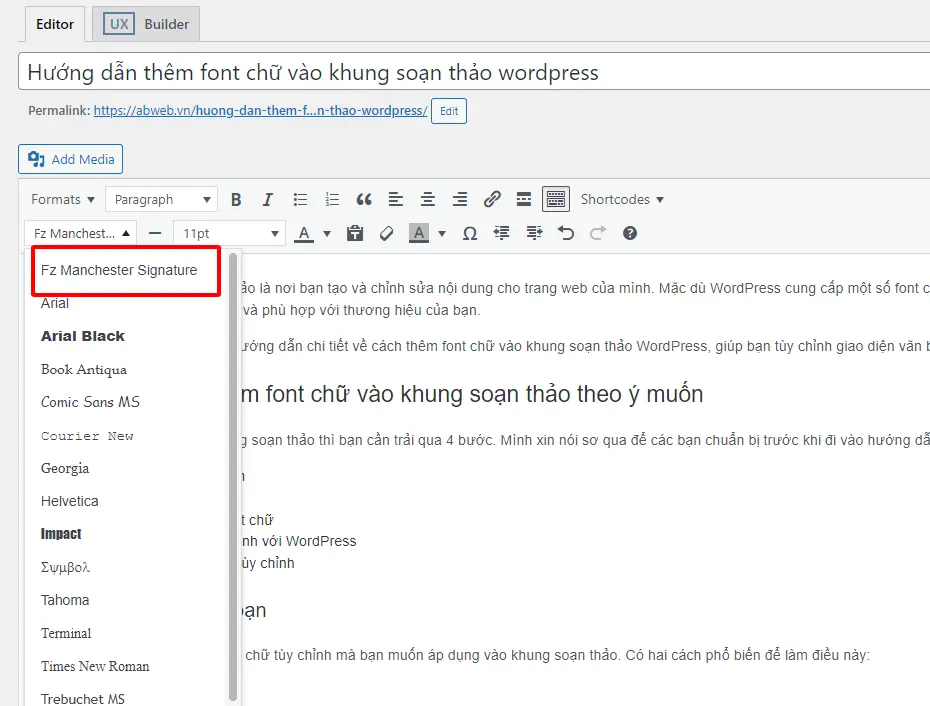
This “Fz Manchester Signature='Fz Manchester Signature',sans-serif;”. is the font I added, if you look closely you will see it has accents ” but not ' As in the lines below, the purpose is to give the added font the highest priority. If you want a font to be at the top, you just need to add that font, rename it, and add a dot. ” and put it on the head
After adding the code in order, in the text editor you will have the order as in the list below:
Next: is also an equally important step. This section will help fonts work in admin
You need to add more code to the file. function.php as follows:
function insert_css_vao_admin() { add_editor_style(get_stylesheet_directory_uri().'/addfont.css' ); } add_action( 'admin_init', 'insert_css_input_admin' );
You add the following code to run the font outside the interface:
add_action( 'wp_enqueue_scripts', 'chen_css_input_theme' ); function insert_css_intro_theme() { wp_enqueue_style( 'add-font-family', get_stylesheet_directory_uri().'/addfont.css', array(),'1.0.1' ); }
You are done with this step. The fonts will now work consistently between your admin editor and your web interface.
Conclude:
So I have just guided you how to add fonts to wordpress in the text editor area. This is how to add fonts to the text editor area in WordPress. By following the above steps, you can easily customize the text appearance of your WordPress website by applying your own fonts.
This helps you create a unique website that suits your style. Try to apply and take advantage of the flexibility that WordPress brings to create the website you want. Hope this article will help you a lot. If you find the article useful, don't forget to subscribe. channel Facebook to get the latest news.


