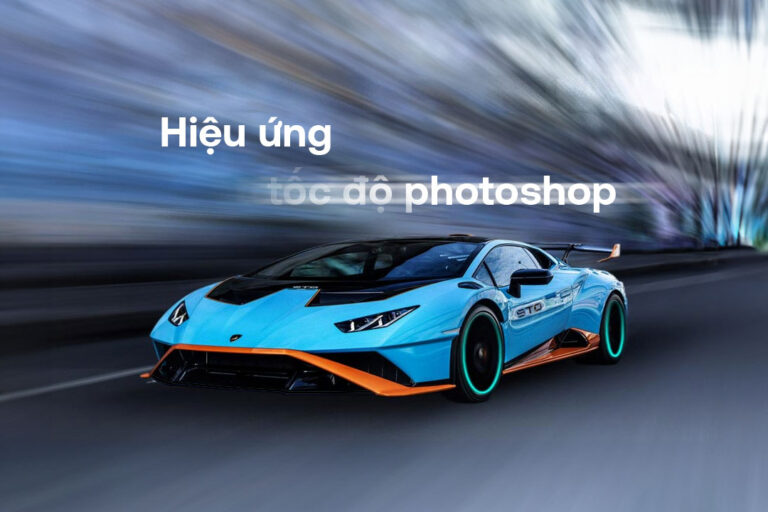
4 ways to create speed effects in Photoshop This is an effect that can be captured with good cameras, including skills and how to shoot to suit the context you want to capture. To take photos that reflect the vehicle's speed, the camera's shutter speed must be reduced. But what about those of you who don't have good cameras or that kind of photography skills?
That's why I will have an article about 3 How to create speed effect in photoshop Just a simple photo, please follow me to do this to create a beautiful photo.
- How to blend colors simply in photoshop
- How to create 3D background in Photoshop
- How to restore photos in Photoshop
- A simple way to mock up a bag in Photoshop
4 Ways to create speed effects in Photoshop
Method 1: Create a speed effect using the Motion Blur tool
Step 1: Open the car and background objects
- File > Open opens the image of the vehicle object and background
Step 2: Use the Motion Blur effect
- Select the car layer, then copy the car object and place it below the original layer
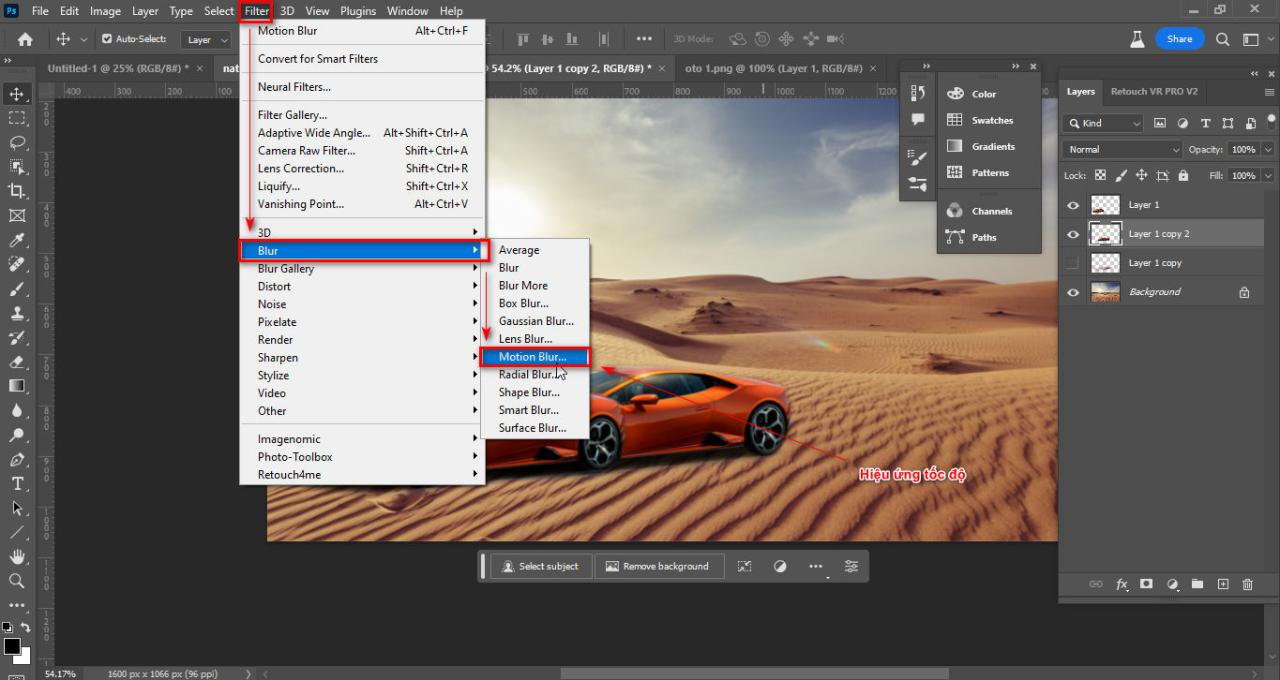
- Select the vehicle layer object then enter it Filter > Blur > Motion Blur
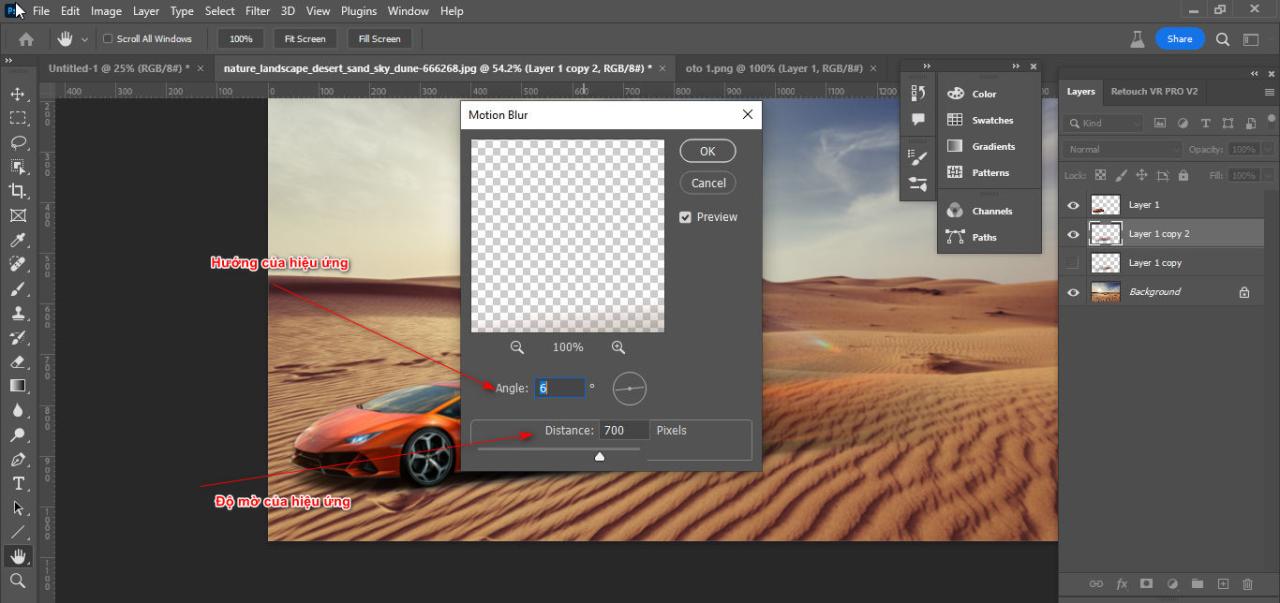
- Effect parameter table Motion Blur
Step 3: Result after using the Motion Blur effect
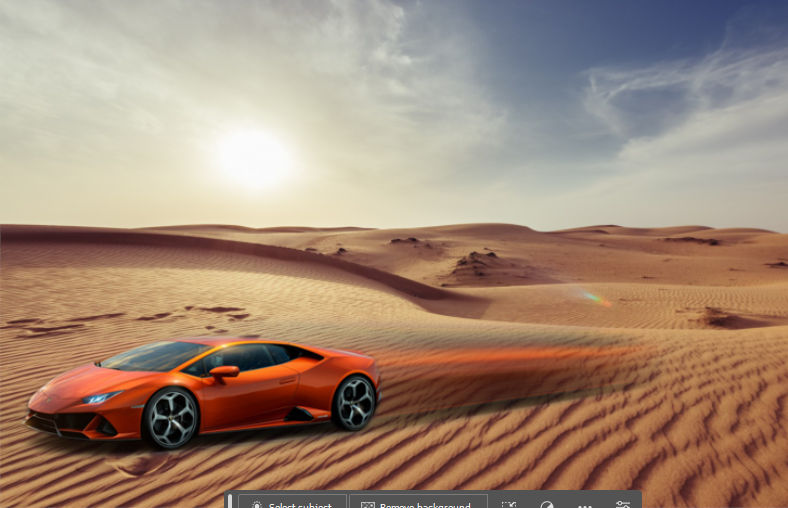
Method 2: Create a speed effect using the Path Blur tool
Step 1: Search and open a photo of the car driving on the street
- I chose Open then opened the image file I downloaded earlier
Step 2: Separate the car object from the background
- Enter Select > Subject Let the machine automatically scan the object
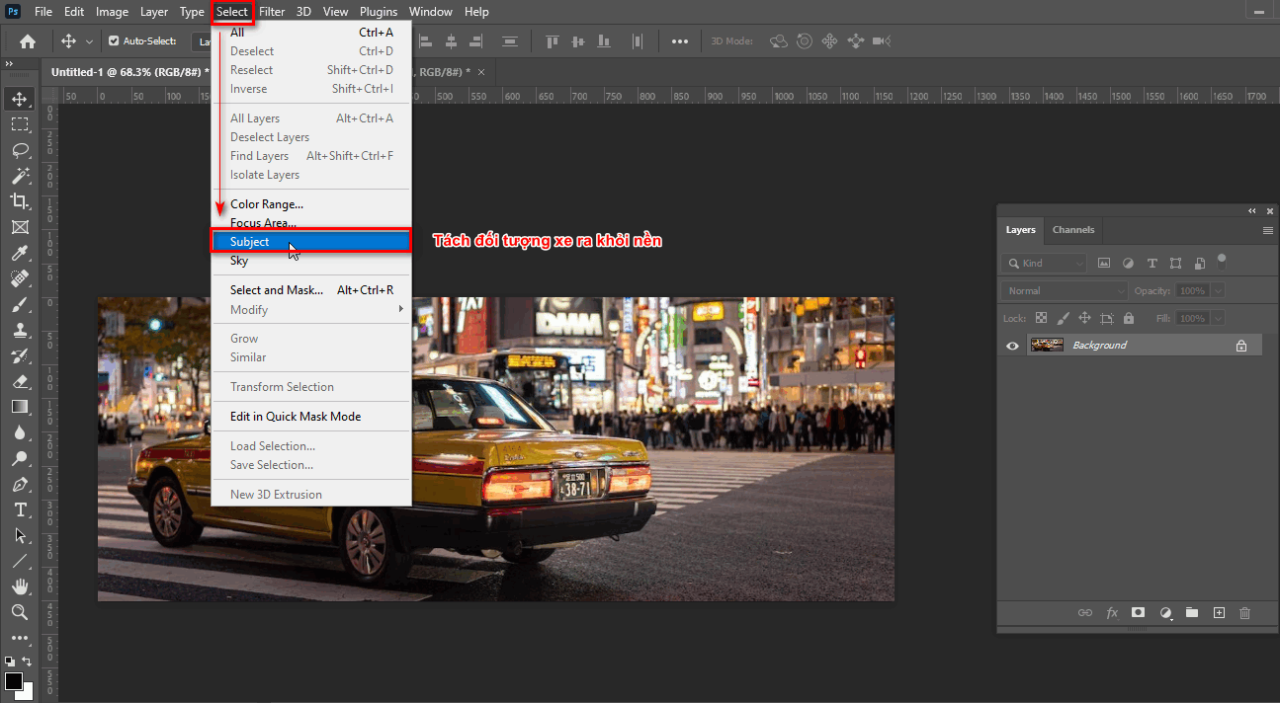
- After scanning, some areas may be under- or over-scanned
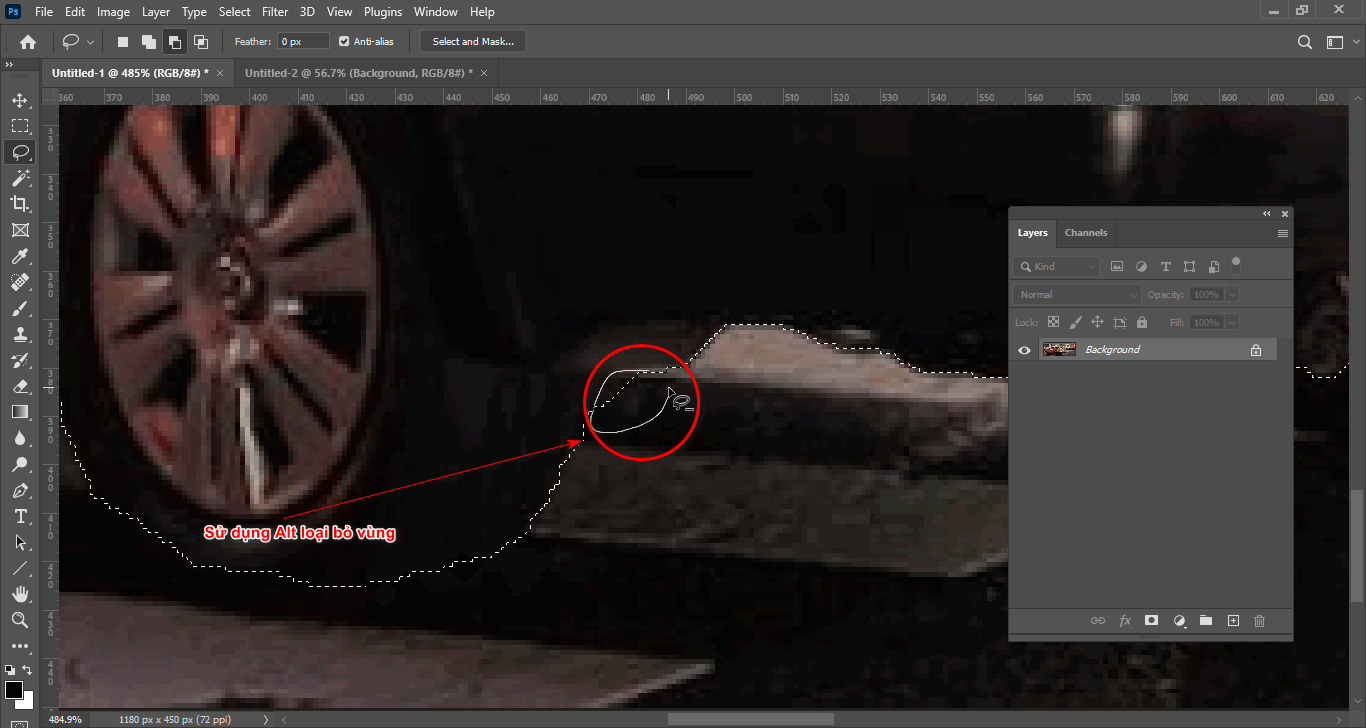
- Now we use the tool Lasso Tool (L) combined with keys Shift To get more missing areas, hold down the key Alt to delete redundant areas
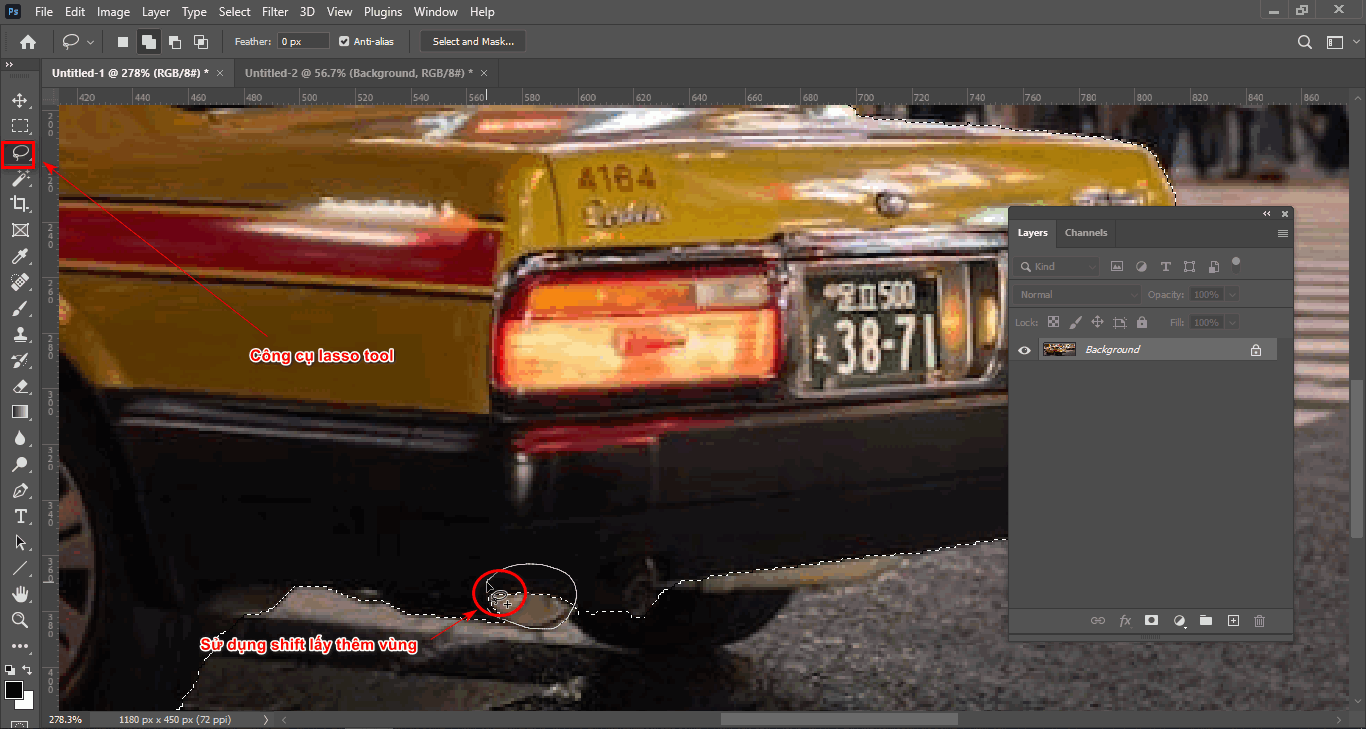
But the part it chose is not what you want ship. ship to get more or keep alt to remove it
- Then duplicate the car object using the key Ctrl + J
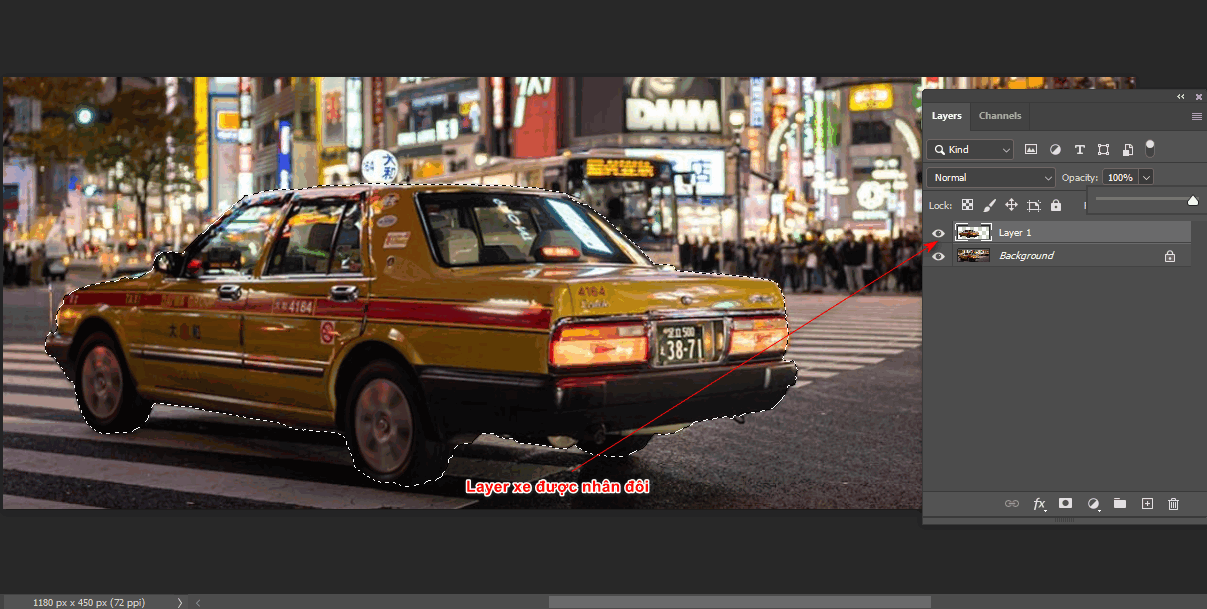
Step 3: Make the car object disappear and turn the background into a speed effect
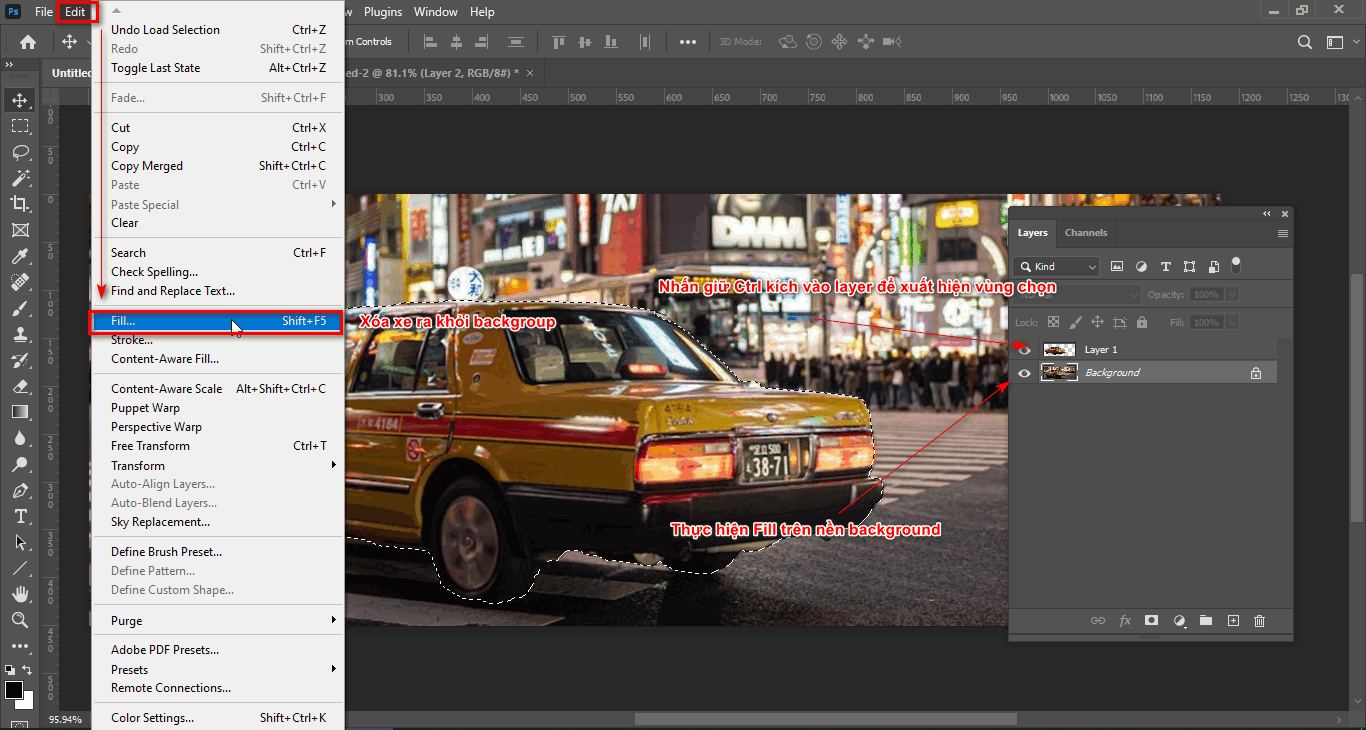
- Press Ctrl Click on the car layer to reappear the selection
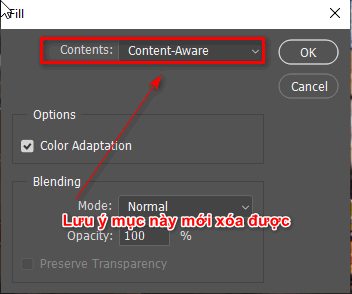
- Then enter the order Edit > Fill to delete the car object in the background
A new tool panel appears for you to operate as shown below
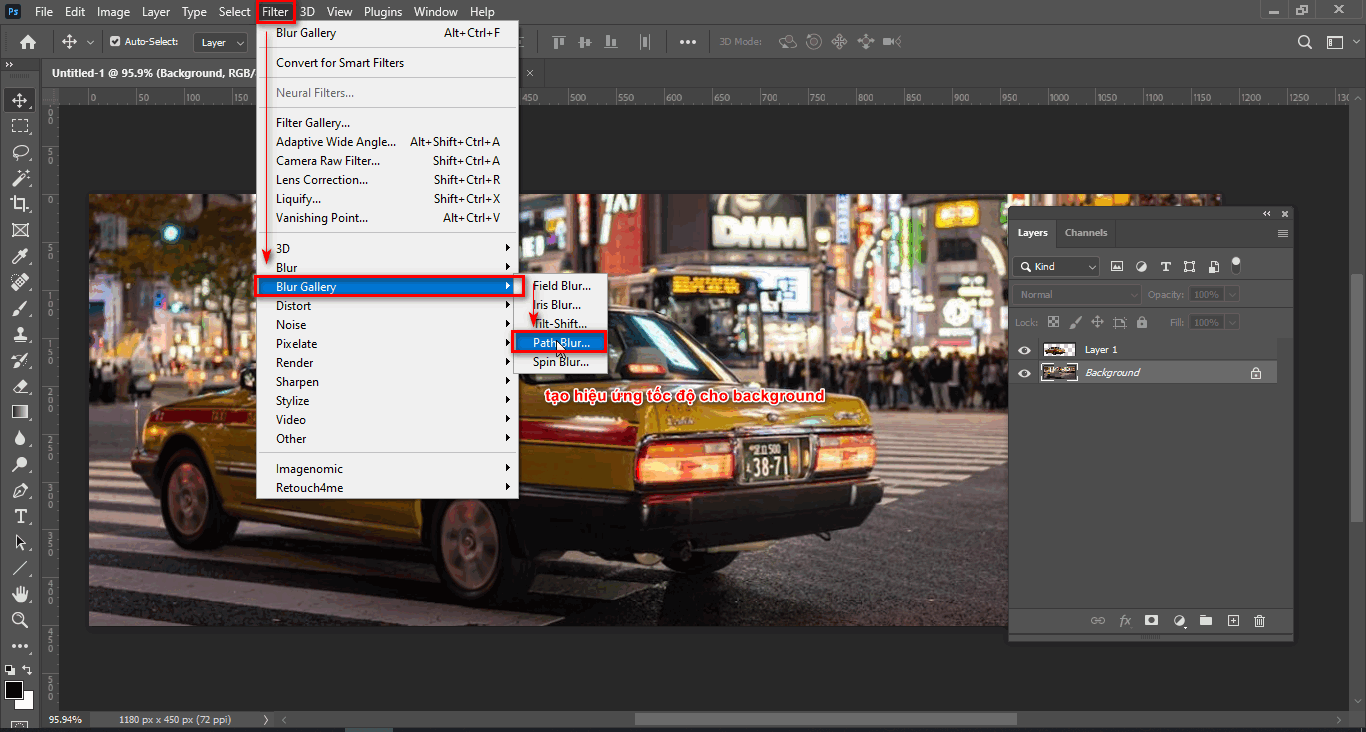
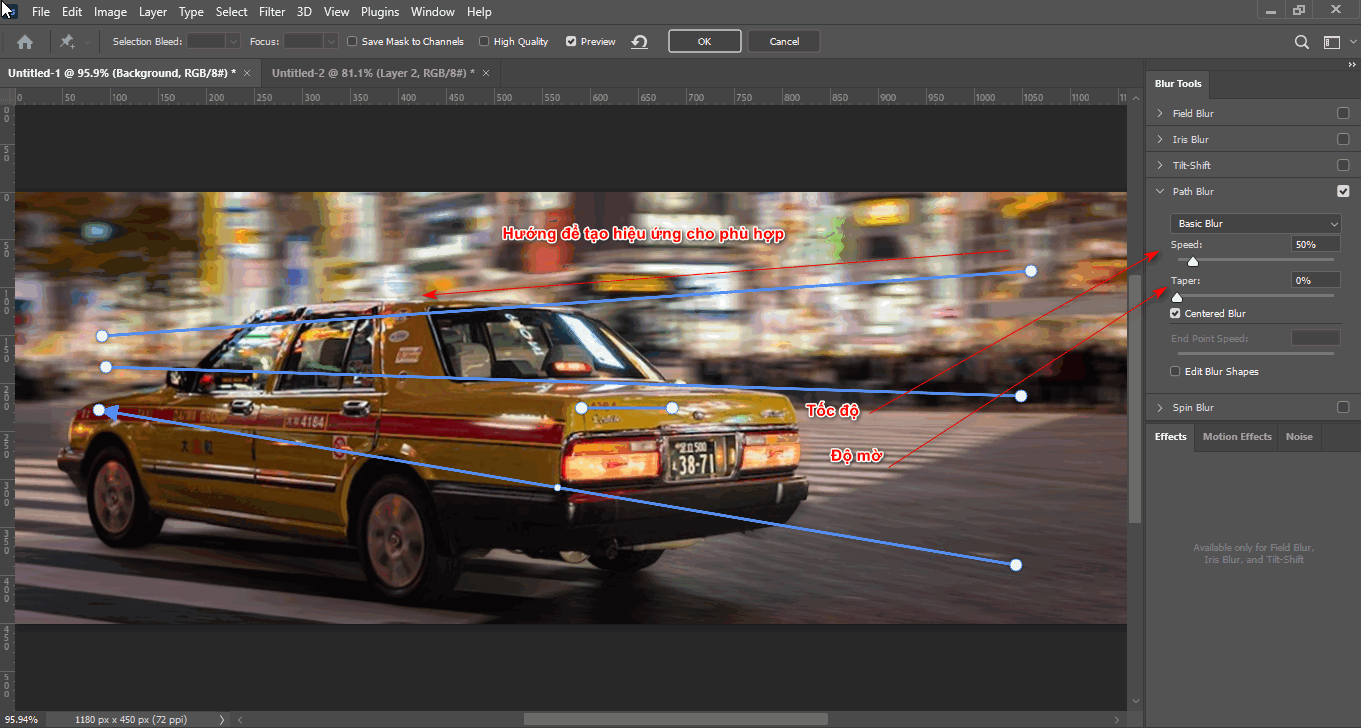
- Now we select the Backgroud layer to create the speed effect we enter Filter > Blur Gallery > Path Blur
- To create a speed effect for the background, click and drag towards the front of the car > now we adjust the speed and opacity as we want (speed, taper) > Ok
Step 4: Create light for the car lights to look like it's running
- Use tools Rectangular Marquee Tool (M) to create a selection of the vehicle's lights then duplicate that object within that selection
- After we're done Ctrl + T then press and hold Shift to extend one edge of the layer that I just duplicated
- We right-click and select command Perspective Then lengthen the 2 corners of the edge to fit
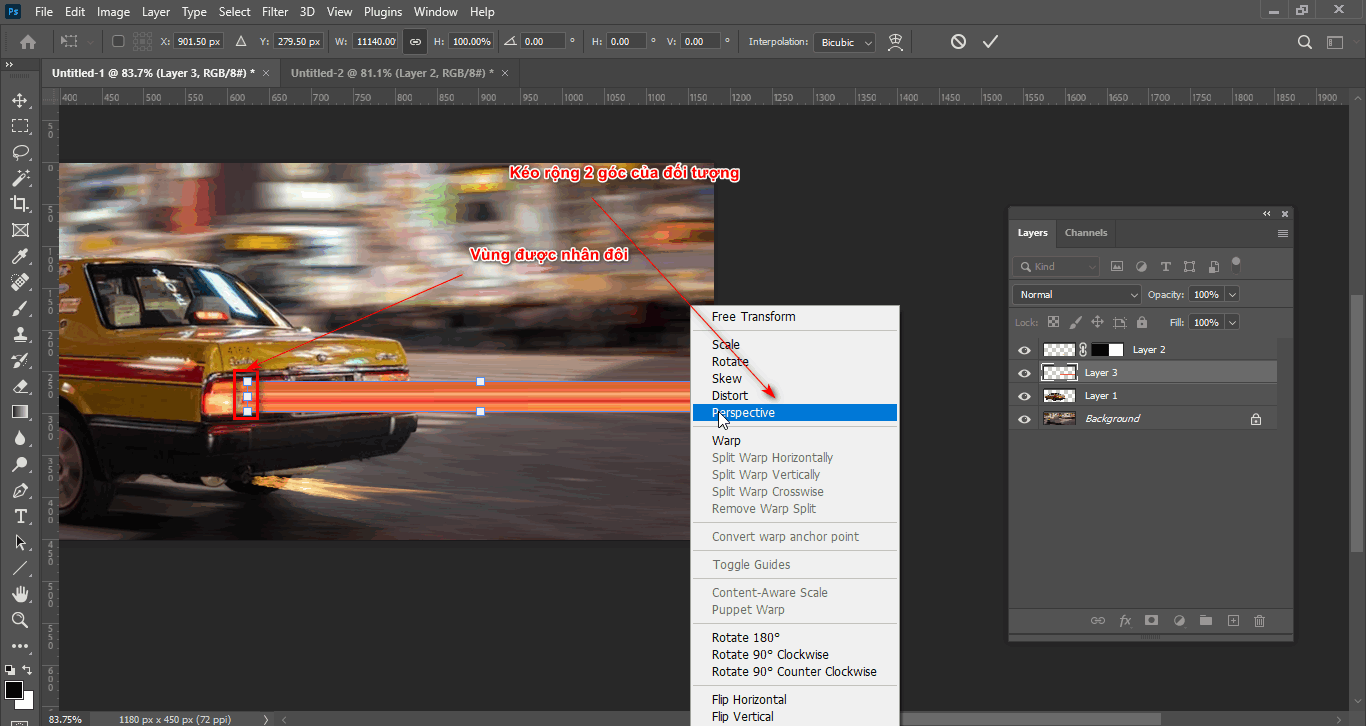
- Use blending modes Screen so that the car lights stand out
- Create a layer mask for that object then use the Brush tool to erase the area near the car lights
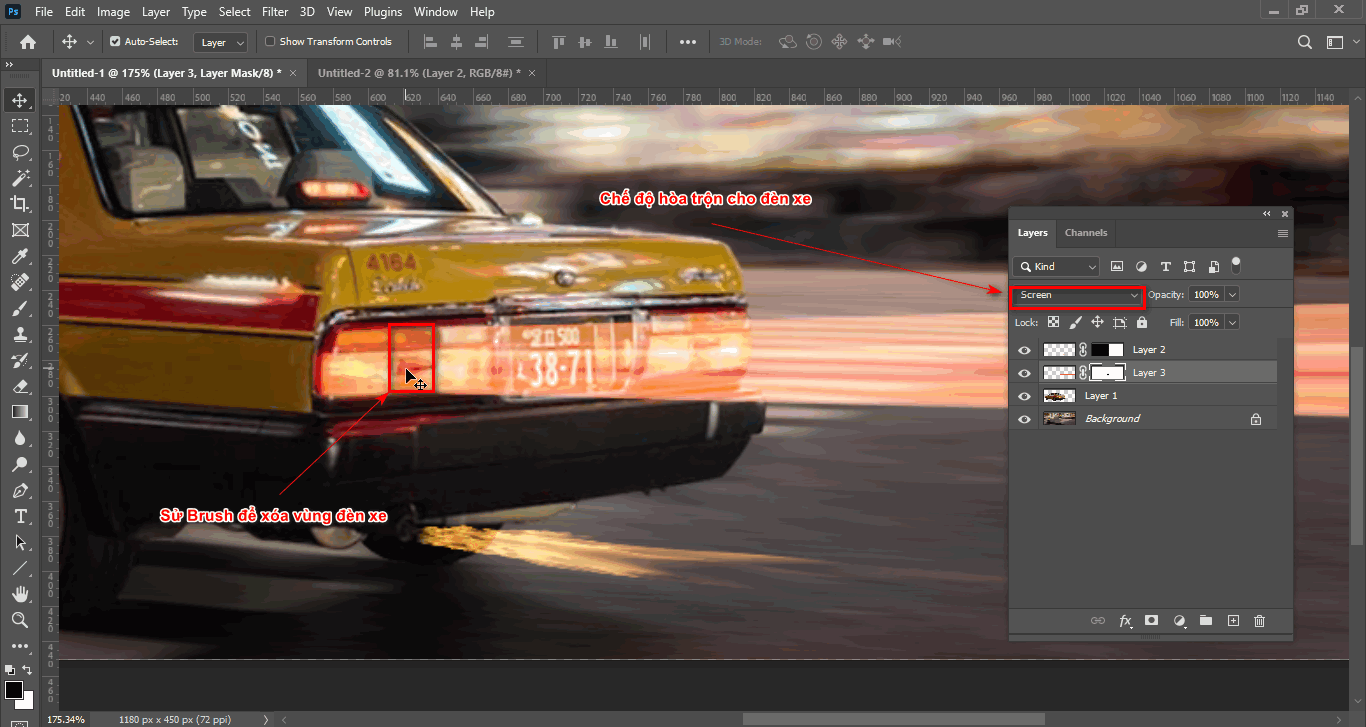
- Duplicate that image and drag it to the next light
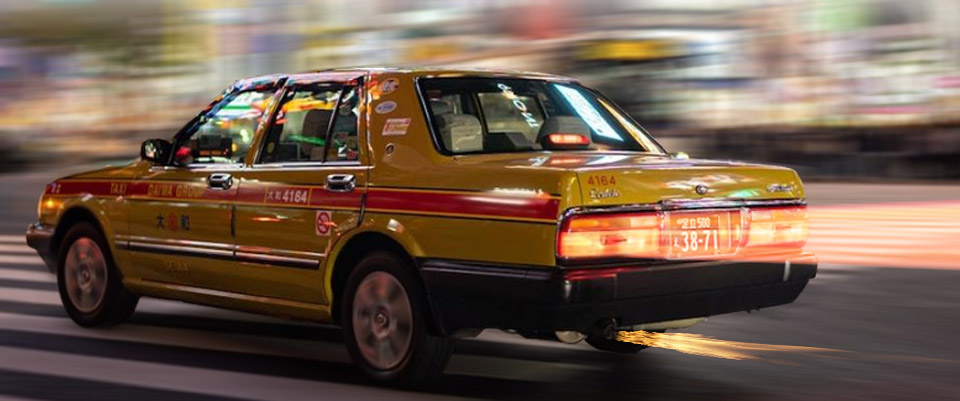
Step 5: Product after implementing 3 ways to create speed effects for cars in Photoshop (part 1)
Method 3: Create a speed effect using the Radial blur tool
Step 1: Open the car and background objects
- Go to File > Open then open the car and background objects
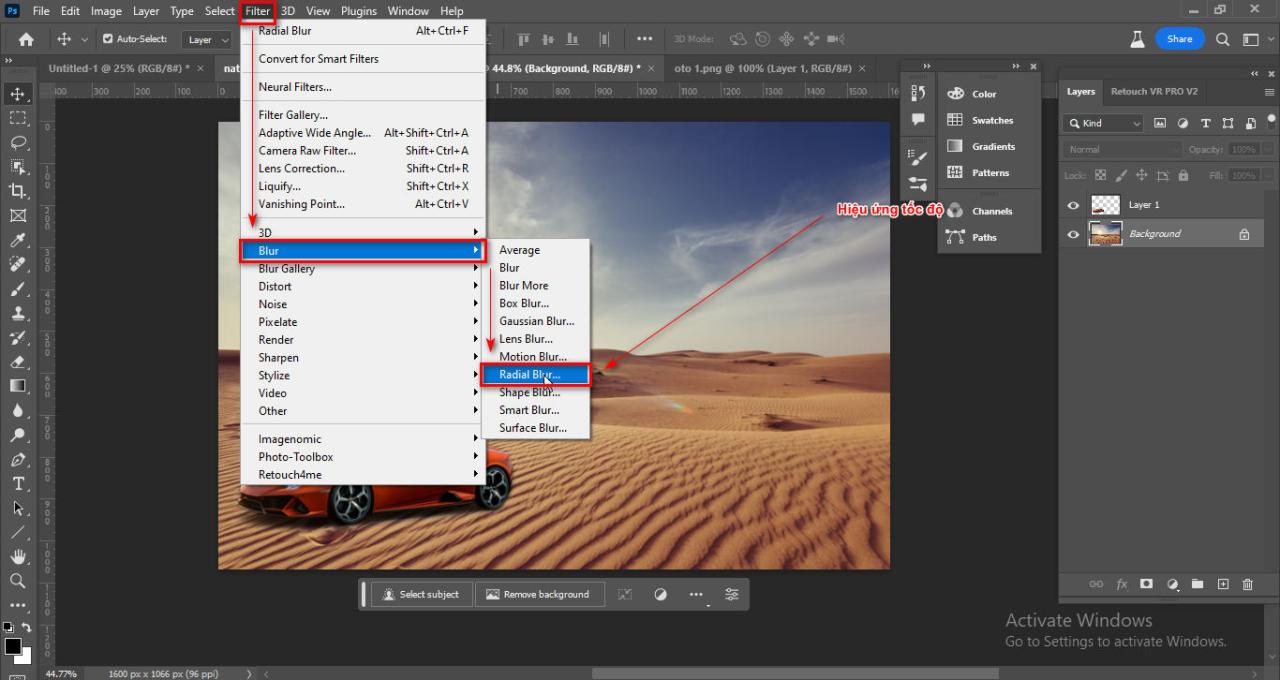
Step 2: Use the Radial Blur effect
- Select the car layer then enter Filter > Blur > Radial Blur
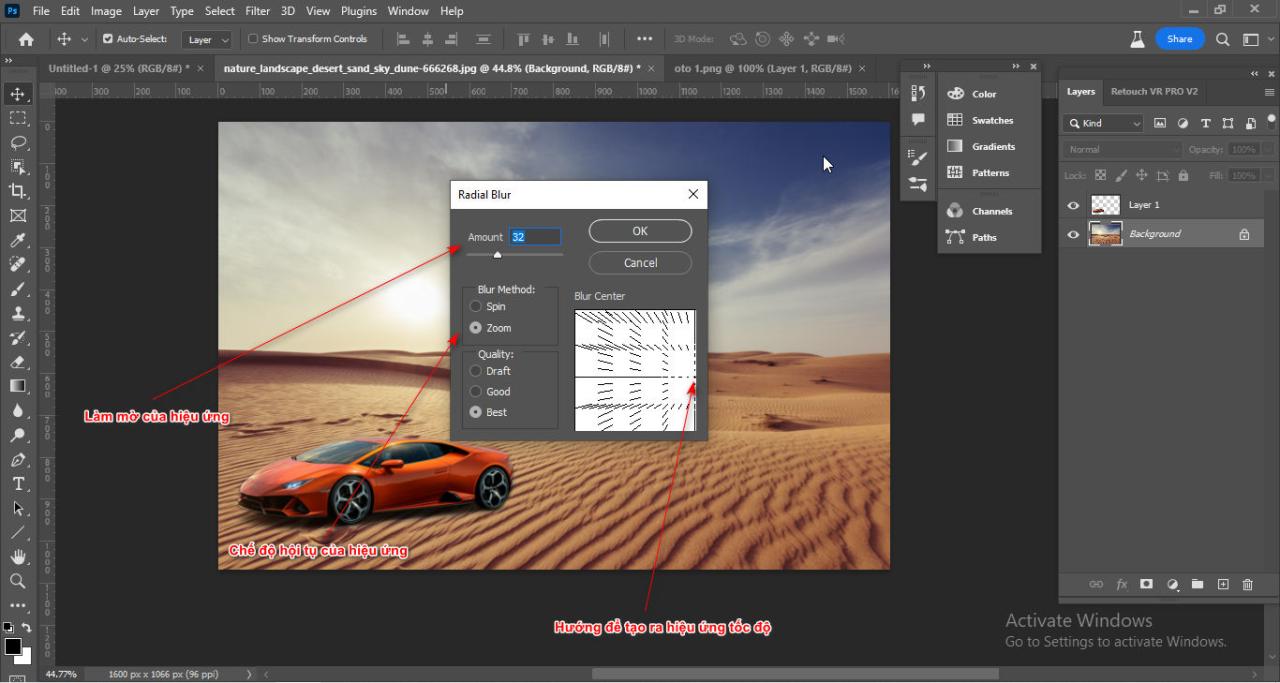
- Parameter table Radial Blur Choose the direction and increase the opacity of the effect
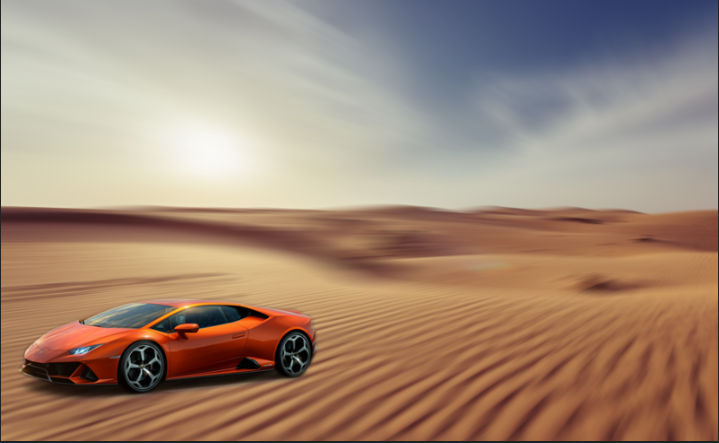
Step 3: Result after using the Radial Blur effect
Method 4: Create a speed effect using Motion Blur in Photoshop
Step 1: Open the image that needs to create the Motion Blur speed effect
- Go to File > Open to open the image or backgroup you want to create a speed effect
Step 2: Bring the car object that has already been separated from the background
See more: Instructions for separating photoshop background very quickly (howto.edu.vn)
- If you have a car photo with the background removed, you can open it and bring it to the backgroup
- Then copy the car photo that has been separated from the background
- I enter an order Filter > Blur > Motion Blur to create speed effects for vehicle objects
- At this time, a parameter table will appear including the direction and opacity of the command Motion Blur > OK
Step 3: Create speed effects for the backgroup
- Draw a selection on the background layer
- Then create a soft border for that selection by entering Select > Modify > Feather
- At this time, I give the parameters that match the photo > OK
- Press Ctrl + J to duplicate the object within that selection
Step 5: Create a black sky for the photo subject
- Hold down the key Ctrl + Click Click on the image of the layer that just created the speed effect
- At this point, a selection of that object appears, then we create a new layer
- After use Gradient Tool (G) Gradient color for sky background
- Then turn off that selection with the command
Step 6: Create a realistic moving wheel effect
- Select Filter > Blur Gallery > Spin Blur to create moving wheels for the vehicle object
- The command parameter table appears Spin Blur
- Click on the object's wheel and a circle will appear, then adjust it so that the circle is inside the wheel
- Then increase the portion Blur Angle to create speed and direction for the wheel object
In short
This is 3 ways to create speed effects in Photoshop Helps you create beautiful photos without using expensive cameras or having no experience in photography.
If you are learning about photoshop course Don't forget to check out our course. We are a graphics training unit Graphic Express 1-on-1 design training helps improve awareness and brings high efficiency in learning.
Wishing you success in your assignment.


