Camera Raw in Photoshop is a tool that has been around for a long time. Camera Raw in Photoshop is used to quickly and effectively correct images and colors, helping you save time during the editing process. This article will guide you through the process. how to use camera raw in photoshop details
You can Download camera raw at home page latest version completely free of charge
Video tutorial on using camera raw
How to use camera Raw in photoshop
Camera Raw in Photoshop Only integrated in PS and CC versions from CS6 and above. If you use Photoshop and cannot find this function, it means your computer is on a low version. Please upgrade your version to use this feature.
To access the tool Camera Raw To use you will do as follows.
Step 1: You open the file you want to edit.
Menu File → Open (Crt+O) We choose any photo to edit
Step 2: Menu File → Filter → Camera Raw Filter (Shift + Crtl + A) to enter camera raw editing. This is the camera raw interface. 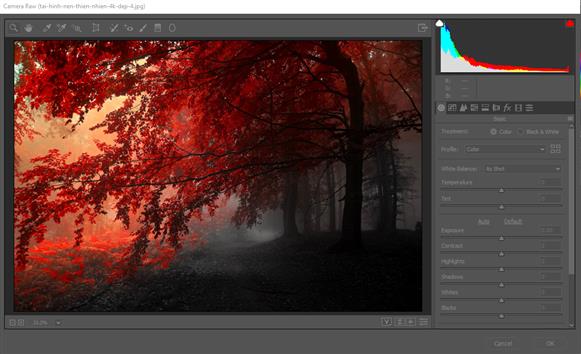
see more
- Photoshop course learn graphics fast
- Download Cameraraw and all versions in 1 single link
- 3 extremely simple ways to remove background in Photoshop
- Summary of common errors in Photoshop
How to use camera Raw in photoshop
Step 3: Functions of some commonly used tools camera raw
- On the first card Basic → Select Auto or default function → Enable preview and preview (Q) when adjusting
- This is the auto function. The default parameters of photoshop are automatically calculated by the software.
- You can customize the parameters you like, but I think you should choose the auto function first to see if the software calculates well or not. If I choose auto for my photo and I am not satisfied, I will customize it again.
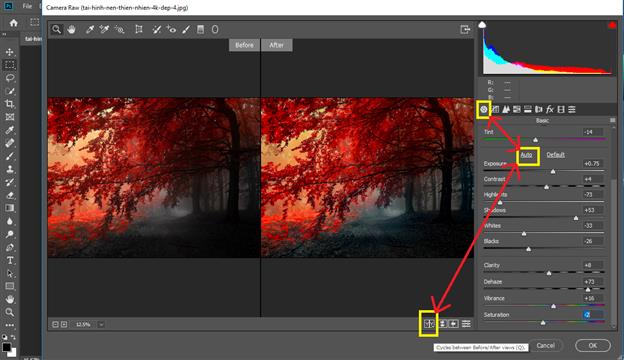 Meaning of raw camera parameters.
- Exposure: Adjust the exposure for the entire photo, you can increase or decrease to adjust the light.
- Contrast: Adjust the contrast of the image, you should adjust this part only a little.
- Highlights: Adjusts only the bright areas of the photo. This is usually reduced to the maximum.
- Shadows: Shadow editing tool and it is the opposite of Highlights tool.
- Whites: Mid-tone white light correction tool
- Blacks: Tool to edit the dark areas of the mid-tones.
- Clarity: Tool to add detail and depth to the photo.
- Vibrance: The tool enhances more vivid colors, especially light green and pink.
- Saturation: You can increase or decrease the color saturation slightly to see the change in the photo.
Step 4: Card Tone Curve 
Card parameters Tone Curve: Card Tone Curve Some editing tools are similar to tags Basic Firstly Parameters
- Highlights: Adjust high white light
- Lights: Adjust the overall lighting for the photo
- Darks: General darkening of the image.
- Hardows: Darkening mainly affects the shadows.
Point: In this part, you can choose by dragging and dropping.
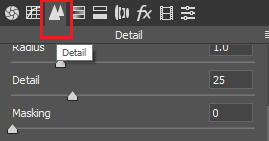
Step 5: Card Detail: Sharpness adjustment tool for photos.HOW TO camera Raw in Photoshop Detailed parameters. Amount: Has the effect of adjusting the object to be sharper and clearer. Detail: When increasing the detail of this card photo, you should not increase it too much.
If we increase it too much, it will cause more noise in our image. Masking: Tool to reduce small grain noise for the entire photo. You can increase this part a little bit to make the photo sharper. You can drag the slider to see the change of the photo. Luminance: Tool to reduce noise from large grains. You should adjust this part sparingly so that the image does not become flat, do not overuse it.
There are also tools Luminance deltail, Luminance contrast, Color, Color detail are the additions to Luminance You can show additional edits to see the changes.
Step 6: Adjust the color of the image 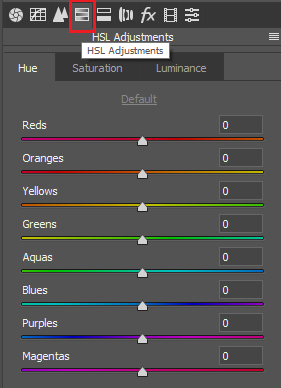 Color is also extremely important in images. It will determine whether our images are beautiful or ugly. HUE: This tag will change the color present in the image. It has all the color properties of RGB, CMYK… Saturation: Color adjustment tool adds darker or lighter color to the image to help the image Luminance: Color correction tool for each area of the image. Correction on a large area of the image.
Step 7: Tools Spot Removal (shortcut is B). Tool to edit redundant details, defects on the image, this tool is used like the tool Path tool (shortcut is J) outside. After editing with the tools, we have the result of the image as shown below. 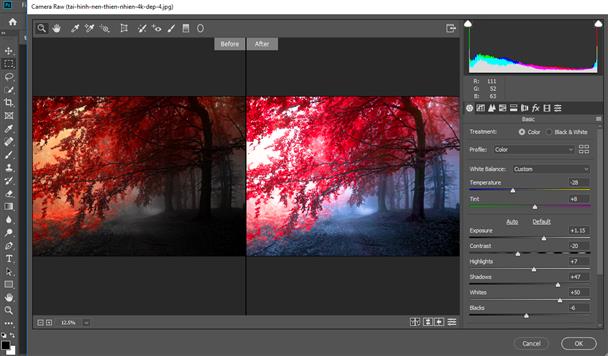 Must say Using Camera Raw in Photoshop very nice, fast processing and very convenient right?
Please subscribe to youtube channel to support us so we can produce more videos.
Good luck. If you have any questions, please leave a comment below for answers.
Source: Learn graphics fast
Conclude.
Camera Raw in Photoshop is a powerful tool that helps users edit and process RAW images effectively. With the ability to adjust brightness, contrast, color and many other parameters, Camera Raw not only brings flexibility to users but also significantly improves image quality.
By using advanced features such as tonal adjustments, sharpening filters, and noise reduction, photographers can create more impressive photos. Thanks to its intuitive interface and good integration with other tools in Photoshop, Camera Raw has become an indispensable part of any photography enthusiast's workflow.


